If a roofer gives you a “quick fix” quote without stepping into the attic, you’re right to feel uneasy. Ceiling stains can come from multiple sources, and the attic is often where the evidence trail becomes clearer—wet roof decking, drip paths, ventilation moisture, or plumbing clues. This guide explains what an attic inspection can reveal, how it helps separate roof leaks from look-alikes, and what to document so a roofer can diagnose correctly.
A quick note before you climb up there
Attics can be hot, cramped, dark, and full of hazards (nails, wiring, low clearance, weak surfaces). If you’re not comfortable, don’t force it. You can still prepare the space and document the ceiling symptom from below, then let a trained professional handle the attic inspection.
Why a ceiling stain isn’t enough to diagnose a roof leak
A ceiling stain feels like the “location” of the leak, but it’s often only the place where water finally showed itself. Water can travel along framing, insulation, HVAC ducts, and even wiring before it drips onto drywall. That means the stain can be several feet away—or even a room away—from the true entry point.
The common trap: treating the stain like the source
Most homeowners (and honestly, plenty of contractors) fall into a logical trap:
- It rained.
- A stain appeared.
- Therefore the roof is leaking directly above that stain.
Sometimes that’s true. But it’s not always true. Plumbing vents, bathroom fan ducts, condensation, and even a small HVAC issue can produce the same “it rained and now I see a spot” timing—especially if humidity changes, temperatures swing overnight, or the attic airflow is poor.
What a “quick quote” misses when no one checks the attic
When no one enters the attic, the diagnosis is built mostly on guesswork and surface assumptions. A roofer might look for obvious exterior damage (missing shingles, cracked flashing, a visible boot tear) and recommend a repair that seems plausible.
The problem is: plausible repairs can still be wrong repairs.
An attic check helps answer:
- Is there active moisture right now?
- Is the wet area on the roof decking consistent with a roof entry point?
- Does the moisture pattern suggest a penetration, a transition, or condensation?
- Are there signs that point away from the roof entirely?
You don’t need an attic inspection for every minor cosmetic issue. But if there’s visible staining, recurring spots, or any sign the issue is worsening, the attic often holds the most useful clues.
What an attic inspection can reveal that the roof surface can’t
Roof surfaces show you what’s exposed. Attics show you what the building is experiencing. That “inside view” can reveal patterns that the exterior can’t.
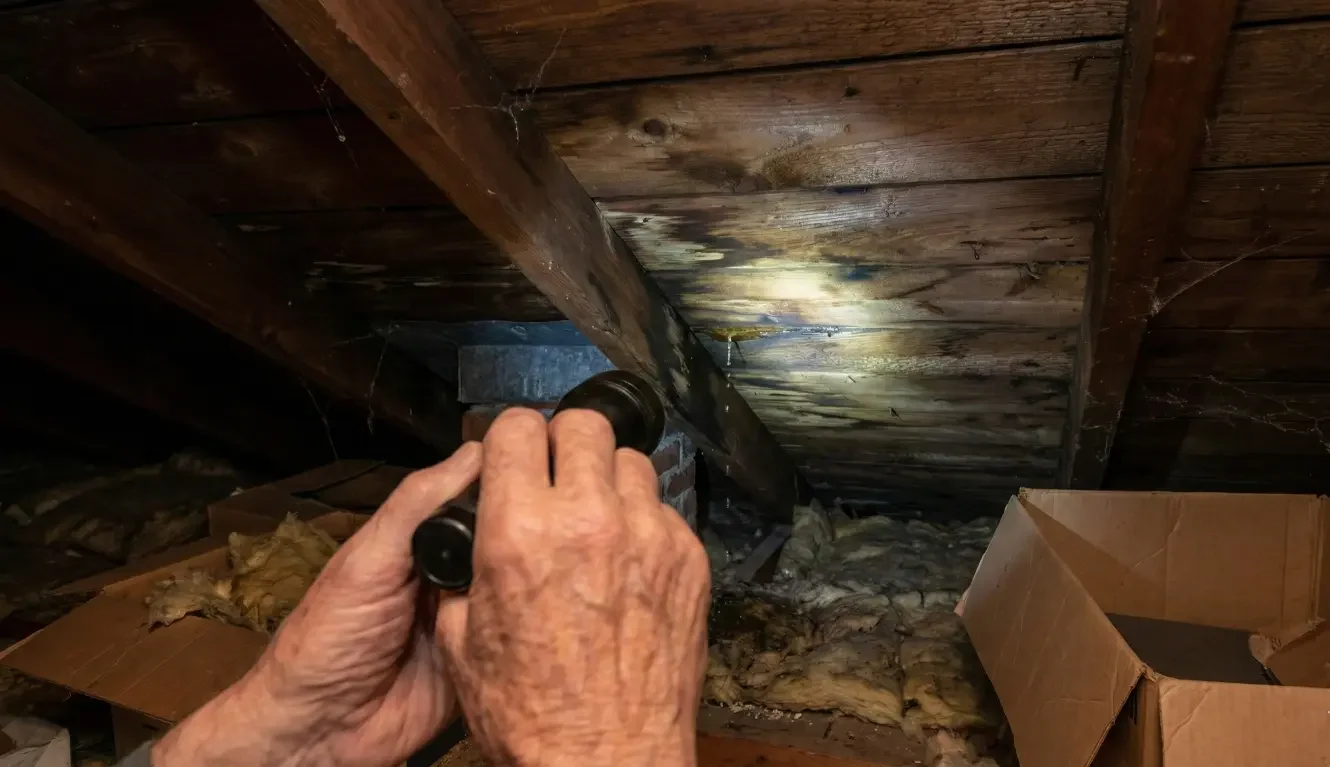
Wet decking patterns and “trail” evidence
The roof decking (the wood beneath the shingles or roofing material) is one of the first places moisture shows up when water is entering from above. In some cases, you can see:
- Darkened areas or staining on the decking
- Dampness that feels cool or slightly spongy (never press hard; just observe)
- Drip marks or “wash lines” where water has moved
- Clusters of fastener stains that suggest repeated moisture exposure
Important: these are clues, not a guarantee of cause. A thorough inspection connects these clues to exterior features and recent conditions.
Drip lines, fastener lines, and penetration clues (observational)
Water often follows the path of least resistance. In attics, that can look like:
- Drip lines: a trail that starts higher and runs down to a lower point
- Fastener lines: a line of dark marks where nails are (sometimes from condensation or tiny moisture events)
- Penetration zones: areas around pipes, vents, chimneys, skylights, and roof-to-wall transitions where many leaks originate
A key benefit of attic evidence is directionality: it can sometimes suggest where to look outside, rather than chasing random roof spots based on the ceiling stain alone.
Roof leak vs plumbing leak vs condensation: the attic clues that separate them
Here’s the misconception that causes expensive mistakes: “A stain after rain means roof leak.”
It can. But similar stains can come from several sources.
This section isn’t about turning you into an inspector. It’s about giving you a mental model for what clues point toward which category—so you can ask better questions and avoid paying for the wrong repair.
Signs that point away from the roof
Some attic clues often suggest you should consider non-roof sources:
- Moisture concentrated near plumbing lines, bathroom areas, or HVAC equipment
- Dripping or wetness on pipes or fittings rather than on the roof decking above
- A localized wet area that doesn’t correlate with any roof penetration or transition above it
- Evidence of intermittent dripping that matches water use patterns (showers, laundry) more than rainfall timing
None of these prove it’s plumbing. They simply raise the “check plumbing/HVAC” flag before you authorize roof work that might not solve anything.
Signs that suggest condensation or ventilation moisture
Condensation can mimic leaks—especially in colder seasons, during temperature swings, or in homes with high indoor humidity. In attics, moisture from ventilation issues may show up as:
- Generalized moisture staining rather than one clean “entry point”
- Moisture near the ridge line or on nails/fasteners in a broad area
- Dampness around bathroom fan ducts or where ducting terminates incorrectly (for example, venting into the attic rather than outside)
- A musty smell or recurring dampness without a clear storm-related pattern
Again: these are clues, not verdicts. The safest approach is to treat them as “diagnosis needs verification,” not as a DIY conclusion.
When it’s still ambiguous—and what to do next
Sometimes the attic shows “some moisture,” but it’s not obvious what’s causing it. That’s normal. Water can travel, and multiple factors can overlap (a minor roof issue plus ventilation moisture).
When it’s ambiguous:
- Don’t authorize a repair based purely on a guess
- Ask for documentation (photos/video) of what was found
- Ask the roofer to explain the evidence chain: “Here’s what we saw inside, here’s what matches outside, and here’s why we believe this repair addresses the source”
- If the roofer won’t inspect the attic (or can’t explain the chain), consider a second opinion
Step-by-step: what a thorough roofer looks for in the attic
A good attic inspection is systematic. It’s not “a quick peek with a flashlight.”
A thorough roofer will typically try to correlate:
- interior symptom location
- attic evidence above that area
- roof features directly above or upslope from the evidence
Decking, underlayment evidence, penetrations, and transitions
Without diagnosing, a careful inspection often involves checking:
- Decking condition: visible staining, dampness, recurring marks
- Penetration areas: where pipes, vents, or chimneys pass through the roof (common leak zones)
- Transitions: roof-to-wall intersections, valleys, dormer areas—places where water flows and details matter
- Insulation clues: wet insulation can hide the true drip path; a roofer may look for compressed or discolored areas without disturbing more than necessary
- “Upslope thinking”: water usually enters higher than where it appears; professionals often inspect above/upslope of the stain location
If you hear only “We’ll fix what’s above the stain,” that’s a yellow flag. A careful roofer thinks in paths and zones, not straight vertical lines.
Ventilation red flags and moisture/mold indicators (cautious language)
Roof leak diagnosis can be thrown off by ventilation-related moisture. A thorough inspection may also note:
- Bathroom fan ducting and where it terminates
- Signs of persistent dampness that aren’t tied to a single storm event
- Mold-like spotting or musty odor (not a diagnosis—just a condition that suggests moisture is present)
- Areas where airflow may be restricted or where moisture seems to collect
A good roofer won’t pretend every moisture sign is a roof leak. They’ll flag uncertainty and recommend next verification steps.
What photos to take in the attic for a roofer (and how to make them usable)
If you do enter the attic (or if you’re helping a family member prepare), your photos should do one thing: make the problem findable and understandable later.
Random close-ups rarely help. What helps is a repeatable sequence.
Wide → mid → close, plus location references
For each area of concern, take:
- Wide photo: show where you are in the attic relative to a recognizable reference (attic hatch, truss layout, a labeled HVAC unit)
- Mid photo: show the section of decking or area where moisture/staining appears
- Close photo: show detail—stain edge, drip marks, damp insulation surface (without digging around)
Then pair those with:
- a photo of the ceiling stain below (wide and mid)
- a note tying the stain to the attic area (“stain in living room near window wall corresponds to attic area above front eave, left of HVAC platform”)
Include scale and orientation; label by room/area
If possible, include:
- A tape measure near the stain area (without touching anything risky)
- A directional cue: “front of house / back of house” or “street side / backyard side”
- Photo labels in your phone notes or filenames: CeilingStain_LivingRoom_2026-01-27 and AtticDecking_AboveLivingRoom_2026-01-27
Usability matters more than perfection.
What not to do (flash glare, only close-ups, missing context)
Avoid:
- Only close-up photos (nobody can locate the spot later)
- Photos with harsh flash glare that hides moisture patterns
- Moving insulation aggressively to “find” the leak (you can create mess, expose yourself to irritants, or miss the real path)
- Walking on unsupported areas (drywall ceilings are not walking surfaces)
If you’re unsure, stop and let the professional handle it.
Preparing the attic for a roof inspection (so the diagnosis is faster and safer)
You don’t need to “clean the attic.” You just need to make it accessible and reduce friction for a thorough inspection.
Clear access path, lighting, hazards to note
Before the inspection:
- Clear a path to the attic hatch
- If there’s a pull-down ladder, make sure it can open fully
- Turn on any attic lighting, or have a safe portable light ready
- If you know about hazards (low clearance, loose boards, pests), mention them upfront
- If you have recent storm dates, photos, or prior repair records, collect them
The goal is to let the roofer spend time diagnosing, not fighting for access.
Safety reminders (high-level)
If you enter the attic at all:
- Step only on structural members (joists/truss chords), not on drywall
- Watch for protruding nails and low beams
- Avoid contact with exposed wiring
- Don’t linger if the attic is extremely hot or you feel lightheaded
- If you don’t have stable footing or you feel unsure, stop
Safety beats curiosity every time.
Common mistakes homeowners make that lead to the wrong repair
The biggest mistake isn’t “not knowing roofing.” It’s taking the wrong action too early.
Patching the ceiling first
Replacing a stained ceiling tile or repainting the stain can hide the timeline and delay proper diagnosis. Cosmetic repair is fine—but do it after you’ve documented and stabilized the source.
Chasing a “spot fix” without evidence
A quick exterior repair might be correct. Or it might be unrelated. Without attic evidence (or at least a documented exterior finding tied to the symptom location), spot fixes can become a cycle: repair, wait, stain returns, repeat.
Ignoring ventilation moisture
Some homeowners fix a “leak” repeatedly when the core issue is moisture accumulation from ventilation or ducting problems. Even if the roof is fine, moisture can still damage decking and insulation. If moisture is present, it deserves a real diagnosis.
Assuming it’s a roof leak because it rained recently
Rain timing is a clue, not a conclusion. Some stains appear after rain because humidity changes, condensation forms, or water moves along pathways that take time to show up.
The most cost-effective mindset is: slow down, gather evidence, then choose the repair.
What to ask when a roofer quotes repairs without entering the attic
If someone quotes repairs without attic access, you’re allowed to ask for clarity. You’re not being difficult—you’re protecting your home and your budget.
Questions that force clarity on scope and evidence
Ask:
- “What evidence are you basing the repair on if the attic wasn’t inspected?”
- “Can you show me photos of the exterior issue you believe is causing the stain?”
- “How does that exterior finding connect to where the stain is inside?”
- “What would you expect to see in the attic if your diagnosis is correct?”
- “If the repair doesn’t resolve it, what’s the next step?”
Listen for calm, specific answers. Vague answers (“It’s probably flashing”) without documentation are a signal to pause.
When to request a documentation-led inspection
A documentation-led inspection is useful when:
- You’ve had recurring stains or multiple “repairs” that didn’t solve it
- The stain is near penetrations, valleys, or complex roof areas
- You’re getting conflicting opinions
- The roofer is confident but won’t inspect the attic or explain the evidence chain
Documentation doesn’t guarantee outcomes, but it does reduce guesswork—and that alone can save you money.
Get the facts, not a guess
A good inspection isn’t just someone “looking around.” It’s a structured assessment that creates usable evidence—photos/video and a clear explanation of what was observed and what it likely means.
What “documentation-led” means
In practical terms, documentation-led means:
- Photos/video of relevant roof areas and (when appropriate) attic observations
- Clear notes tying evidence to your interior symptom location
- A plain-English summary of what’s confirmed, what’s uncertain, and what should be done next
How Red Top’s inspection-first approach helps decide repair vs replacement
If you’ve got a ceiling stain and someone quoted a repair without checking the attic, slow down and get better evidence first. Red Top Roofing can perform a documentation-led inspection—photos/video and a clear summary—so you’re not guessing whether it’s a roof issue, ventilation moisture, or something else.
FAQ content
Do roofers need to inspect the attic to diagnose a roof leak?
Not in every situation, but an attic inspection can be a major advantage when there are ceiling stains, recurring symptoms, or conflicting opinions. The attic can reveal moisture patterns or clues that help confirm (or challenge) an exterior assumption.
Can a ceiling stain be caused by something other than the roof?
Yes. Ceiling stains can come from roof leaks, plumbing issues, HVAC/duct problems, or condensation related to ventilation and humidity. A thorough inspection helps separate these possibilities.
What attic signs suggest condensation instead of a roof leak?
Broad moisture patterns, dampness not tied to a single point, musty odor, or moisture near ventilation ducting can be clues. Because multiple sources can overlap, a qualified inspection may be needed to confirm the cause.
What photos should I take in the attic for a roofer?
Use a wide → mid → close sequence. Include a wide photo showing where you are in the attic, a mid photo of the affected area, and a close photo of the moisture/staining detail. Pair that with photos of the ceiling stain below and add simple labels (room/area/date).
How do I prepare my attic for a roof inspection?
Clear access to the attic hatch, ensure lighting is available, note any known hazards, and gather any relevant info (storm dates, prior repairs, when the stain appeared). Don’t move insulation aggressively—let the roofer inspect safely.
When should I get a second opinion if a roofer won’t enter the attic?
If the roofer is quoting repairs based on assumptions, can’t show documentation, or can’t explain how the proposed repair connects to the interior symptom, it’s reasonable to get a second opinion—especially for recurring or worsening stains.
Request a documentation-led roof inspection
If you’ve got a ceiling stain and someone quoted a repair without checking the attic, slow down and get better evidence first. Red Top Roofing can perform a documentation-led inspection—photos/video and a clear summary—so you’re not guessing whether it’s a roof issue, ventilation moisture, or something else.
Get a homeowner attic-photo checklist (free download)
RELATED LINKS:
EPA (mold + moisture basics for homeowners)
U.S. DOE (Durable Attics – ventilation, moisture, common moisture sources)