When a hailstorm finally goes quiet, it can feel almost as loud inside your head as it was on your roof. You’re looking at granules on the driveway, maybe a new water spot on the ceiling, and you’re wondering who you’re supposed to call first. Insurance? A roofer? 911?
Those first 24 hours really do matter. They shape how well you document what happened, how safely you respond, and how prepared you are for any potential insurance claim later. This isn’t about turning you into an expert—it’s about giving you a simple, calm first 24 hours after hail roof damage checklist you can follow without second-guessing every step.
What to Do in the First 24 Hours After Hail Roof Damage?
Use this guide as your day-one companion: what to do, what to avoid, and how to move from “oh no” to a clear next step.
Before You Do Anything: Stay Safe and Take a Breath
The instinct after a severe storm is to rush outside and see what happened. That’s understandable—but it’s not always safe.
Before you touch a doorknob or step onto the porch, pause for a moment and check in with yourself:
- Is the storm fully over, or is lightning still active in the area?
- Are you seeing any obvious hazards out the window—like tree limbs on power lines or shards of glass on the ground?
- Do you have shoes on, or are you about to step out in socks or slippers?
Your first priority is safety, not speed.
From inside your home, look out through windows and do a basic safety scan:
- Downed power lines: If any wires are down, treat them as live and stay well away.
- Broken glass or debris: Look for shattered ornaments, skylights, or window glass scattered on patios and driveways.
- Flooding or standing water: Water can hide sharp objects and may be in contact with electricity.
If you see anything that looks like a serious safety risk—such as downed lines, strong gas odor, major structural damage, or water coming into electrical fixtures—skip ahead in your mind: this is an emergency services situation first, roof questions second.
Take a deep breath. You’re not trying to fix everything today. You’re just trying to stay safe and gather enough information to make good decisions.
The First 10 Minutes: Quick Exterior Scan From the Ground
Once it’s clearly safe to step outside, your next move is a short, ground-level scan—not a full inspection and definitely not a roof climb.
Think of this as a “walk-around” to get a feel for what the storm may have done:
- Put on closed-toe shoes with good grip.
- If it’s dark, grab a flashlight and be cautious of slick surfaces.
- Walk slowly around your home, staying on the ground and off ladders.
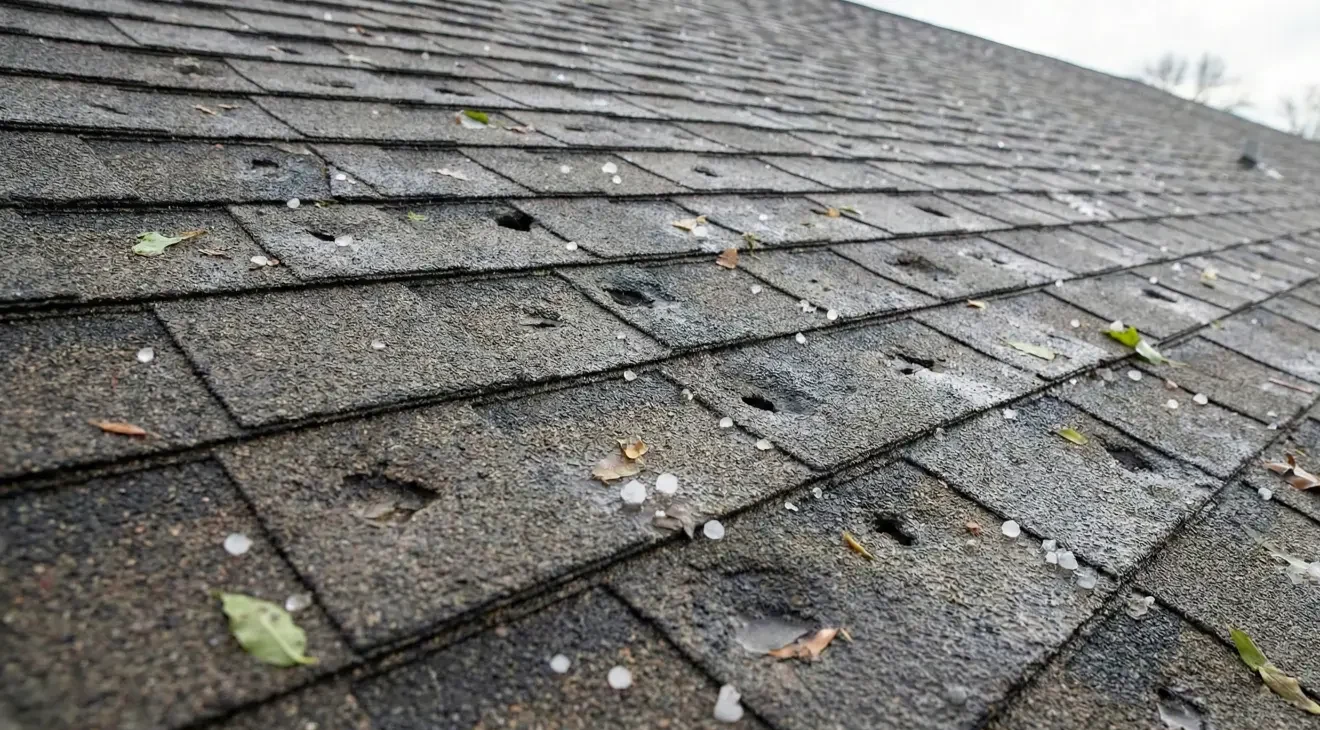
As you walk, look for some common hail-related signals:
- Granules on the ground or driveway: Small piles of shingle granules washed down from the roof and out of downspouts.
- Dented gutters and downspouts: Soft metals often show hail impacts more obviously than shingles.
- Dings on mailbox, metal window frames, or AC unit housing: These can hint at the size and intensity of hail that hit your roof.
- Siding marks: Chips, cracks, or impact spots on vinyl or other siding.
You are not trying to diagnose the exact damage level—just getting a sense of whether the storm hit your property hard enough to warrant a closer look.
Most importantly: do not climb on the roof. Fresh hail, loose granules, and wet shingles make roofs extremely slick. Roofers use specific safety gear and techniques for a reason; a fall isn’t worth it.
Document What You See (Without Overdoing It)
Once you’ve done that initial walk-around, the next step is simple documentation. You’re not building a legal case—you’re just gathering clear, time-stamped evidence of what things looked like right after the storm.
Use your phone to take photos of:
- Granule piles at the ends of downspouts or along the driveway.
- Dents on downspouts, gutters, mailboxes, metal railings, or AC units.
- Any obvious damage to siding, windows, or outdoor fixtures.
- Debris like large branches on or near the roof.
Inside the house, take a quick tour and look for:
- New water spots on ceilings or upper walls.
- Drips or damp areas around light fixtures or ceiling fans.
- Wet spots in the attic if it’s safe and easy for you to access (no balancing on joists or moving insulation).
A few tips so this stays manageable:
- Take clear photos, not hundreds of nearly identical ones.
- If you record video, narrate what you’re seeing and where you are (“This is the back left corner over the dining room”).
- Don’t move or disturb anything that could be unsafe just to get a better angle.
The goal is simple: capture visible signs of possible hail impact while everything is fresh. It supports the “facts, not guesses” approach later when you talk to a roofing professional or, if appropriate, your insurance company.
What NOT to Do in the First 24 Hours
Knowing what to avoid is just as important as knowing what to do. In the first day after a hailstorm, a few common missteps can create extra stress or confusion later.
Avoid:
Filing a claim immediately, before you have good information.
It’s natural to think “storm hit, must file,” but without a clear understanding of the actual damage, you may end up with confusion, repeated inspections, or a claim that doesn’t match what your roof really needs. It’s usually better to combine your documentation with a professional inspection before deciding what to file.
Letting anyone start repairs without documentation.
If a contractor wants to “go ahead and fix it today” without walking you through damage photos or a clear scope, press pause. Once materials are removed, it’s harder to show what actually happened during the storm.
Signing anything on the spot from door-to-door chasers.
Storm events attract aggressive contractors who knock doors soon after hail stops. Be very careful about signing any “inspection authorization” or “agreement” without reading it fully. Some of these documents can lock you into a contractor before you’ve compared options.
Assuming damage is minor because there’s no leak yet.
Leaks are just one symptom. Hail can bruise or crack shingles in ways that don’t show up as immediate dripping water. That’s why the combination of your photos and a careful inspection matters.
When to Call a Roofer vs. Emergency Services
Not every hailstorm is a 911 situation—but some are. Understanding the difference between “call emergency services” and “call a roofer” helps you prioritize correctly.
You should consider calling emergency services (such as 911 or your utility provider) if you notice:
- Downed power lines or sparking electrical equipment.
- A strong smell of gas in or around your home.
- Severe structural damage, like a partially collapsed roof or ceiling.
- Active flooding that’s interacting with electrical outlets or appliances.
These are safety issues first and roof issues second.
You should consider calling a roofer promptly if you notice:
- Active leaks during or immediately after the storm (water dripping from the ceiling, light fixtures, or seams).
- Soggy or sagging areas in ceilings that suggest water pooling above.
- Significant granule loss, dented gutters, and other surface clues that hail hit hard.
When you do talk with a roofer, ask about an evidence-led inspection, not just a “quote.” You want someone who:
- Takes their own photos and videos of suspected damage.
- Explains what they’re seeing in plain language.
- Helps you understand whether the roof appears repairable or more likely to need replacement.
The difference between a quick glance and a documented inspection can be the difference between more guesswork and a clear path forward.
When to Contact Your Insurance Company (and Why Timing Matters)
A big question for most homeowners: “Should I call my insurer right now?”
It can feel like calling right away is the “responsible” thing to do. But filing a claim before you understand the condition of your roof may lead to confusion or the need for repeated visits and conversations. Generally, it’s helpful to line up your information first:
- Your own photos and notes from the first 24 hours.
- A professional, documented roof inspection that clarifies what actually happened.
- A basic understanding of whether the issues appear storm-related and potentially claim-worthy.
Insurance companies ultimately decide coverage based on your policy and the adjuster’s judgment. A good roofing inspection doesn’t override that; it simply helps everyone communicate more clearly about what’s on the roof and what’s needed.
When you’re ready to talk to your insurer, you’ll be able to:
- Share dates and times (when the storm hit, when you noticed signs of damage).
- Describe visible indicators in simple terms (“We saw granules at the downspout and dents in the gutters”).
- Refer to an inspection report or roofer’s documentation, rather than just a hunch.
The goal is not to delay unnecessarily, but to avoid calling with nothing but worry and no information.
What a Proper Inspection Should Include (and How to Verify It)
Not all “inspections” are the same. A drive-by glance or a quick ladder peek doesn’t give you much to work with.
A more complete roof inspection after a hailstorm typically looks at:
- Shingles or other roofing material: Checking for bruising, cracks, missing pieces, or impact marks.
- Decking (the structure under the shingles): Looking for signs of soft spots or deflection where impacts may have compromised support.
- Flashing: Inspecting metal around chimneys, vents, and roof-to-wall transitions to ensure it hasn’t been bent or loosened.
- Ventilation components: Examining vents, ridge vents, and other protrusions for hail dents or cracks.
- Gutters and downspouts: Confirming impact marks on soft metals and checking how much granule loss has occurred.
A documentation-led inspection also includes clear photos or video, organized in a way you can understand:
- Overviews of each slope.
- Close-ups of suspected damage.
- A simple explanation of what’s normal wear versus likely hail impact.
You can verify the quality of an inspection by asking:
- “Can you walk me through your photos and explain what I’m seeing?”
- “Where do you see normal aging, and where do you see probable hail damage?”
- “Based on what you see, does this look more like a repair situation, or could it be closer to a replacement scenario?”
A roofer that’s focused on evidence, not just a quick sale, will welcome those questions.
Common Mistakes Homeowners Make After Hailstorms
In the stress of the moment, it’s easy to fall into patterns that create headaches later. Here are a few mistakes to watch out for:
Assuming no problem because there’s no leak.
Leaks can take time to show. Hail damage might start as compromised shingle surfaces that only become leaks after repeated rain.
Relying on a quick self-check and calling it good.
A walk-around is helpful, but it’s no substitute for a trained eye on the roof and its components.
Ignoring “soft metal” clues.
If gutters, downspouts, or metal vents are pockmarked, that’s a sign the storm was strong enough to potentially harm roofing materials too.
Choosing a contractor purely on speed or low price.
“Fast and cheap” can feel attractive when you’re worried about your home, but you want a roofer who explains their findings, documents the roof, and respects both your safety and your budget.
Letting paperwork pile up.
Waiting weeks to organize photos, inspection notes, or correspondence can make it harder to recall exactly what happened. Create a simple folder on your phone or computer labeled with the storm date and keep everything together.
Avoiding these mistakes doesn’t require specialized knowledge—just a bit of awareness and a calm plan.
Your Next Step: Request a Free Documentation-Led Inspection
By the time you’ve followed this checklist through your first 24 hours, you’ve already done a lot right. You’ve stayed safe, taken a ground-level look, documented what you see, and avoided rushing into claims or contracts before you had to.
The next logical step is simple: bring in a roofing professional who can turn your photos and your concerns into a clear, documented picture of your roof’s condition.
Look for a local, storm-experienced roofer who:
- Talks in terms of inspection and documentation, not just “free estimates.”
- Is comfortable explaining what they see in everyday language.
- Respects that you may or may not decide to file a claim, and doesn’t pressure you either way.
You don’t have to guess what the hailstorm did to your roof. With the right inspection, you get:
- A straightforward explanation of what’s real—and what’s not.
- Visual evidence you can keep for your records.
- A clearer sense of whether repair, monitoring, or a claim-aware replacement conversation makes sense.
You don’t have to solve everything in one day. You just need a good first 24 hours and a trusted expert to help you decide what comes next.
How do I know if hail caused real roof damage?
If a hailstorm has passed and you see signs like shingle granules at downspouts, dents on gutters or metal fixtures, or new water spots on ceilings or upper walls, it’s worth getting a professional inspection. Soft metals such as gutters and downspouts often show hail impacts more clearly than shingles, so visible dings there can be a clue that your roof may have been hit hard enough to need a closer look.
Should I call insurance or a roofer first after hail?
In many cases, it’s helpful to talk to a roofer first so you can combine your own photos with a documented inspection. That way, when you call your insurer, you’re describing specific observations rather than a vague concern, which can make conversations and next steps clearer. Your insurance company still makes coverage decisions, but better information usually means less confusion.
What should I photograph after a hailstorm?
Take clear photos of granules on the ground, dents on gutters and downspouts, marks on siding, and any visible damage to windows or exterior fixtures. Inside, photograph new ceiling spots, damp areas, or leaks you notice. A few well-framed photos in each area are more helpful than dozens of similar shots.
Can small leaks wait until morning?
If you see active leaking, try to safely contain it with a bucket or towels and keep the area clear of electronics or valuables. Small, slow leaks may be able to wait for a roofer visit, but if you’re seeing significant water intrusion, ceiling bowing, or anything that looks like it could turn into a collapse, treat it as urgent and prioritize safety.
How fast do I need an inspection after hail hits?
It’s usually smart to arrange an inspection within days of the storm, while signs are fresh and before minor issues have a chance to worsen. You don’t have to handle it in the first hour, but scheduling relatively soon can help you make better decisions and keep your documentation tied clearly to the storm.
What are signs of hail damage on gutters and downspouts?
Look for round or irregular dents on the front faces and tops of gutters and on the exposed portions of downspouts. These dings may appear in clusters or along the length of the metal. If you see consistent impacts and also notice granules washing out of the downspouts, it’s a good indication the hail was strong enough to justify a roof inspection.
You don’t have to guess what the hailstorm did to your roof.
Get a documented inspection that shows what’s real—and what’s not.
No pressure, no assumptions, just clear evidence to guide your next step.
Request your free inspection today.
RELATED LINKS
The International Building Code – ICC